Monday, September 21, 2009

Principles of photography - Leading lines


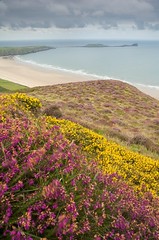
Heather at Worms Head
Originally uploaded by Nevoir.

It can be difficult to convey the same sense of depth that you saw when taking a picture to the viewer.

In the photo above the subject really is Worms head which is the outcrop that pokes out into the sea from east side of Rhossili Bay.

I wanted to draw the viewer through the picture by layering colour across the bottom third of the frame. The mound in the middle ground was perfectly shaped to point out Worms Head in the distance.

The result is designed to guide the eye through the image to the subject, to deliberately influence what you look at and in which order you look at it.

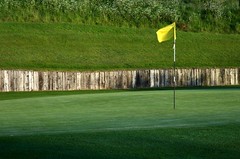
The image above doesn't use a classic leading line but it uses the same principle. Typically leading lines in landscape photography are provided by rivers, railway lines and even logs and branches but really you can use whatever you can find.

We use them as a focal point that directs interest through the frame to your subject. They don't have to be straight, they just need to draw your eye and take you off into the image. 

Essentially they are a compositional trick to add structure to an image, but critically they are a way of focussing the viewers gaze on the subject of the image as well as adding depth.

Some examples of leading lines from more traditional to the more abstract can be seen below:


A classic use of a leading line guiding the eye up to the Arc de Triomphe with some added jazz courtesy of the long exposure.


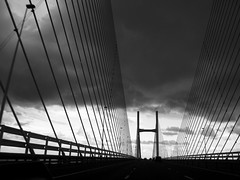
Another classic leading line, this time with a bit of a curve for added interest all leading to the old Cammel Laird ship yard on the banks of the mersey.


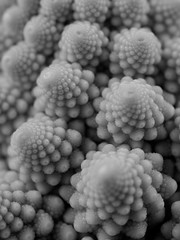
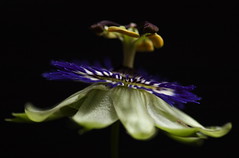
A less conventional leading line but the same effect of giving the image depth is achieved. In this example the sense of depth is amplified by the shallow depth of field.


Try and look out for objects that will provide leading lines and place them in the foreground of your pictures and see how compositionally your pictures improve.

Tuesday, August 04, 2009

Principles of Photography - Simplicity


beach huts
Originally uploaded by Nevoir.

I've spent the last 10 years reading pretty much everything I can get my hands on to do with photography.

I'm going to try and distill a lot of what I have picked up along the way into a series of blog posts that focus on different principles of photography.

The first principle that I am looking at is simplicity.

In the photograph of the beach huts I deliberately went in close and tried to simplify the subject into blocks of vivid colour.

I could have gone for a wider shot but that would have added nothing to the shot as it's clear what the subject is despite showing so little of it.

This technique can be used when photographing something that has been shot a million times before. It can enable you to take a unique shot of something familiar.

It makes for an interesting challenge when you frame a shot to ask yourself how you can simplify the image. 

Be ruthless and try and reduce the amount of clutter as much as possible. This can be particularly effective when shooting monochrome to produce graphic images that look like fine art.

When you first get to a location it can be hard to see what to shoot. By learning to simplify your photos you will begin to realise how many shots can be made from just one location.

Simple shots are easy to visually process and are as a result pleasing to the eye. You can see how effective these can be to convey a mood by studying the style of shots available from shops such as IKEA. Much of their photography makes use of this principle which allows people to mix and match to easily create a relaxed feel to decorate a living room or bathroom.

The next time you go and shoot challenge yourself to simplify your image. Force yourself to consider every element within the frame. Cut out anything you don't want within the frame and not during post processing. 

Let me know how you get on!

Monday, July 27, 2009

Sources of photographic inspiration


Spirals
Originally uploaded by Nevoir.

Feeling inspired is possibly the most important motivator to getting out there and taking photographs.

I often hear how fellow photographers are going through a dry patch of feel that everything they are taking is rubbish.

It’s the photographers equivalent of the yips. You seem to have lost the ability to see like a photographer and it’s a frustrating experience.

Here’s a few ways that I’ve managed to escape the yips in the past that you might find useful.

Flickr – By joining groups and widening your network on flickr you will continually see great photographs by you peers.  This feeling of community is great for getting feedback and encouragement as well as ideas for new ways of shooting. 

Podcasts – Do a search on iTunes and you’ll find loads of photo podcasts. I love the Magnum in Motion podcasts. There is something special about seeing photos put to music and a narrative. Try some of these top photo podcasts to brighten up your commute tomorrow.

Magazines – There are loads of photo mags out there and after subscribing to a few I noticed how they seem to recycle the same old articles. They are great however for giving you ideas for photo projects. It may be just what you need to get you back out there.

Books – Just yesterday I picked up “Earth from the air” by Jann Arthus-Bertrand and immediately wanted to grab my camera and head for the hills. Sometimes it’s too easy to forget how inspiring great photos can be.

Get printing – A classic symptom of the digital age is not bothering to print your pictures. Get yourself down IKEA, get some ribba frames and frame up some photos and stand back and admire your photos.

Exhibitions – Exhibitions are great because they often make you realise that you are better than you think! Set yourself that challenge of doing an exhibition in  local cafe. Its cheaper and easier than you think and a great learning experience.

DVD’s – After getting the David Noton and Strobist DVD’s I’ve realised what a brilliant medium they are for learning. People learn in different ways but scan YouTube for snippets to see if they work for you.

Expert tuition – I’ve tried a few courses that have ranged from the wonderful “Lakeland Photo Holidays” to rubbish local one run by a wedding photographer who clearly wasn’t interested. These courses can work out expensive but can often push you in a different creative direction and its always refreshing to meet fellow photographers.

Fellow photographers - I'm sure that every photographer has hit a brick wall at some point. Speak to your photo mates and see what has got them out of the doldrums. You may have a favourite photographer to whom you can turn to for inspiration. Check out their latest work and see if it sparks some ideas.

Get shooting – All too often I go out to take some shots and get frustrated that what I’m shooting is rubbish. I think you've got to give yourself a chance as it takes a while to start seeing as a photographer again. Treat it as a warm up. Accept that you will take some rubbish but you if get at least one that’s a keeper then its a case of job done.

Golf is often describes as a series of tragedies interrupted occasionally by flashes of brilliance. Photography can sometimes feel like this too.

If you are stuck in a rut try one of these ideas and let me know if it worked for you!

Tuesday, July 21, 2009

RAW (good god) What is it good for? Absolutely everything


One question I get asked about quite regularly is whether people should be shooting raw or not. The short and simple answer is that if you care about your photography you should be shooting raw.

Raw is simply a file format. The typical decision that most people are faced with is do I shoot raw or jpg?

The majority of people choose jpg because they have heard of it and it gives them loads of shots on their cards. Raw however, sounds weird, eats up available memory and means more time at the computer so why should you be using it?


1.  Memory is cheap

In the olden days people shunned raw because of how much space the files consumed. I just checked on Amazon and memory cards are almost free these days and the good news is that they are going to continue to get cheaper!

Raw images will eat up loads more space on both your memory cards and your hard disc but with the cost of storage continually falling it’s no longer a reason to not use it.

The amazing thing about digital is that taking photos becomes free. You should be taking advantage of this by shooting lots of images and saving the keepers and ditching the rubbish.

With plenty of memory in the camera you can ensure that you’ll never have to worry about running out of space again as you know its going happen when that dream scene appears in front of you.

Accept sods law and plan for it, you cant fight it!


2. Correct images without losing throwing away quality

When you “process” a raw file you adjust it to suit what you want and then save a version as a jpg. The adjustments can be undone or tweaked to your hearts content without any detrimental effects to the raw file.

Every time you open and edit jpgs you throw away picture quality. Once jpgs are opened and repeatedly saved they are thus repeatedly re-compressed which effects the image quality.

You can see the effect of this in some jpgs where the image develops what are known as artifacts that are caused by over compression.

This can leave your images with a smeared appearance, reminiscent of the classic 80’s “Vaseline on the lens soft focus effect”.


3. Get the best quality original

What is the point in spending your hard earned £’s on the best camera you can afford, then spending your precious spare time taking photos if you are not taking the best quality originals that you can?

I always like to think that every time I go and shoot I might get that 1 in a million shot. Imagine that happening and then realizing you were shooting a low quality jpg and that your dream photo will never hold its own beyond a 800x600 version on flickr.

You would be gutted, don’t let it happen. If that hasn’t convinced you nothing will, you might as well go and sell your camera on eBay.


4. Get back what you shot in the first place

When you shoot film you get a negative that represents what you took. The processing machines takes this negative and changes it to give a normalized exposure and colour contrast etc.

The beauty of film is that you will always have the original negative. The problem with this is that keeping negatives free of dust is almost impossible. Even if you manage this the task of scanning, dust cloning, correcting is so arduous you’ll wish you never started.

When you shoot jpg you process the image in the camera. The camera makes lots of decisions for you and produces what it thinks is the best image. You’ll never get back what your camera has thrown away.

With raw you get the best of both worlds. You get the original file to which you can batch correct white balance and exposure. You are not throwing data away. You are not manipulating the image but just correcting it to represent what you saw.

The tools that you can use to work on raw files are widely available. A few that you might want to look into include:

Or read this comprehensive review of raw software at ultimateslr.com


5. Flexibility is your friend

We all make mistakes – we leave white balance on the wrong setting, we get the exposure wrong so why not give yourself more options and flexibility?

Within your typical raw file editor you can change the white balance to what you want and you are also able to tweak the exposure (typically by +/- 2 stops). This gives you a get out of jail card if for whatever reason you screwed it up in the field.

By shooting raw you are giving yourself a break. I am a typical weekend warrior when it comes to photography. My dedicated photo trips are few and few between so why not build in some flexibility around mistakes that you might make?

In the interests of arming you with useful information you need to consider what might be drawbacks to you when shooting raw.

Larger file sizes mean longer card writing times so raw is typically a non-starter for sports photography.

You may not have the right software to open and edit raw files so this is likely to be another expense.

By shooting raw you are inevitably going to need to convert the file to another format such as jpg to do anything with it. This means more time in front of the computer, which is never a great thing.

All things considered I think the quality argument wins it for me every time. Why not give raw a try and see if it fits with your style of shooting. You’ll quickly learn how you can adjust your workflow to accommodate what it the most flexible and highest quality file format.

Tuesday, July 07, 2009

Canon G10 - my first impressions


severn bridge
Originally uploaded by Nevoir.

After a week of using the Canon G10 I though it timely to post a few first impressions.

Many of these points are not unique to the G10 but will stand out if you, like me, are getting used to using a point and shoot digital after an SLR.

What is great about the G10?

The size of the screen is a stand out feature. The resolution of the screen is fantastic and makes composing and reviewing a breeze. You'll need to shield it from bright sun as it makes it almost impossible to see anything on the screen.

The live histogram is a great feature that helps to make better exposures first time. It gives great feedback in manual mode of the effects of changing apertures and shutter speeds which helps you to maximise the tonal range in your images. The screen also darkens/ lightens to give additional feedback about the impacts of your adjustments.

The camera gives you the choice of seeing everything or nothing in terms of settings on the screen. You can choose to see the classic two thirds composition aid which is a great tool. I found with so much noise it can make composing an image with the screen really difficult. You can choose to see fewer settings but this removes the crucial ones which is frustrating.

Manual controls

I was interested to see the extent to which you could manually control the camera. It actually is quite powerful and is a great mode to use if you want to take complete control. The one surprising constraint is a minimum of f8 which is usually the half way point within your aperture options.

Of course the most important element is picture quality. From what I have seen the G10 delivers fantastic image quality provided you support the camera properly. An old rule of thumb with an slr is to never shoot at a shutter speed that is less than the focal length of the lens. So if you are using a 50mm lens then dont drop below 1/60th second. The G10 makes it difficult to know what focal length you are shooting at but it will warn you if are likely to get camera shake.

I bought a retro leather wrap over case (SC-DC60A) to protect the G10. It looks great but is taking a bit of getting used to with the poppers and nowhere to store a spare battery or card. Possibly a case of style over substance (quite literally). I like the way that the case screws into the tripod screw thread but it make getting to the SD card difficult.

Raw shooting

The option to shoot raw is a big draw and I see no reason why I will ever change it to shoot jpeg given that SD cards are so cheap.  I wouldn't have bought a camera without raw as an option and this will be a primary concern for many of you looking for a good quality digital compact.

One of the great things things about these types of cameras is that their portability makes it more likely that you will take them out with you. Also i've noticed that with this camera i'm more likely to bother taking a few shots than I might with an slr. This has already meant that i've got a few shots that I would never have got with an slr. 

 What has bugged me about the G10?

There are various things that have taken a bit of getting used to. With an slr in say aperture priority mode its easy to see what shutter speed you will get at a chosen aperture. With the G10 you have no idea until you half press the shutter release which is annoying.

The viewfinder is like the cameras appendix, a throwback to a once useful tool that has been superceded. The viewfinder is pretty much useless, when you look through it you dont get any info on any of your camera settings. Worse still when you zoom in and out the field of view remains the same so its useless for composing.

I was annoyed to find out they had removed the time lapse feature that was available with the G9. You can buy a remote release with a timer to get the same effect but its annoying that you need to buy another tool to do this.

Its certainly not the cheapest camera but i'm sure i'll get my moneys worth as it'll get a hammering if i've got it with me all the time. 

Summary

If you are after a very good quality second camera to have with you all the time you won't go far wrong with the G10. It offers a great trade off between features and portability and i'm looking forward to seeing how it will improve my photography.


Wednesday, July 01, 2009

Night photography tips


One of the most rewarding aspects of night photography is that you never really know what you are going to get. When shutter speeds start to extend beyond the norm you get some wonderful shifts in light and colour that you will never see with the naked eye.

It is these unknowns that can help to breathe new life into well known and photographed landmarks such as the clifton suspension bridge. It also gives you some great photography options during the winter months where it becomes a bonus that its dark when you leave work.

So how do you go about getting shots like the one above? It's really an extension of the same techniques that you will use for landscapes but of course everything takes a little longer.

Shooting in low light presents some unique problems to the photographer. First and foremost if you want to shoot with small apertures such as f16 & f22 then your shutter speeds are going to be in the region of seconds which of course means you'll need a tripod. 

If its the darker side of dusk then i'll generally start in aperture priority at f8 and see what shutter speed i'm getting. Make sure your ISO is as low as possible as at long shutter speeds digital files can get really noisy (grainy) which looks nasty on screen.

Generally the approach is to experiment. Take a shot at f8 and see what you get. With traffic in the shot you'll never get the same shot twice so take loads to increase your chance of getting lucky.

My camera has a noise reduction mode which cleans up the images once they are taken to help to cope with that noise problem I mentioned. This is great but can take ages and hammers the batteries, particularly if its cold. You generally don't have a choice but to use it so make sure you have plenty of spare power.

Exposure is generally trial and error but you can get a good starting point from spot metering off the brighter area of the sky so that you will not burn it out when you shoot. In the shot above I metered from the area above the bridge and bracketed to try adding and removing exposure until I got the effect I wanted.

One vital point is that you'll need to trigger the camera by some sort of remote release or self timer. If its windy take the strap off your camera as this will cause some unsharpness. You should also avoid shutter speeds of between 1/10th - 1" second as the mirror in your slr can also cause some vibration.

The best time to shoot these shots is around dusk. You'll get some great colour in the sky and your shutter speeds will still be manageable. With a bit of natural light around you will find that focussing is so much easier too.

If you want to get a shot like the one above find the slide on the rock on the clifton side of the bridge and you will get some great light in the western sky as the sun drops over Avonmouth.


Thursday, June 25, 2009

A lesson learnt


mc hammer lives in brislington
Originally uploaded by Nevoir.


I generally try and make time to take pictures. Often i'll get stuck into work in the week and decide that I will do take some photos during the weekend in order to feed the habit. This doesn't seem to be working. Surely the perfect balance is to try and weave photography into everyday life. This is the new plan.

Part of this plan if i'm honest seems to be an elaborate  way of justifying getting myself a compact camera that I can sling in my bag and take with me everywhere as my slr is just too big. I think i'm going to get the Canon G10, shoots raw, nice big screen and not too big.

The importance of just having any old camera with me struck me after posting this shot of a local sign to flickr a couple of weeks ago. Its received more views, comments etc than any shot i've posted that have been meticulously taken with expensive kit. The mc hammer shot was taken with a little ixus, the camera is irrelevant, its all about the photo. 

Don't get too obsessed with kit, the magazines will make you think you need all sort of gubbins but you'll be amazed how much you can do with a basic camera and a 50mm lens. If you go out and spank a fortune on a camera that you are too worried about taking out of the house then what's the point?

The best advice that i'm trying to follow is that as a photographer you should have your camera with you everywhere you go. This is great advice. Not only will you never miss an opportunity but you'll be taking pictures every day and as a photographer you'll be indulging your passion. I'm off to the camera shop (again).

Wednesday, June 10, 2009

Trying something new...


_DSC0428
Originally uploaded by Nevoir.

After having been inspired by a recent Chase Jarvis blog about trying something new I took his advice and had a go at combining two great passions of mine, photography and golf.

The shot above is one of many I got from a fantastic evening shoot at a local course during which I was lucky to get both some good light and free reign of a pretty deserted course.

What struck me as I was taking the shots was how I go through a series of steps when taking a photo that I always go through but never really give much consideration at the time.

In the interests of sharing know how i've outlined some important things to consider when you are out with your camera.

1. Choose your composition

I always use a tripod for this type of shot. The problem with tripods is that they are a hassle to adjust. Frame your shot with your camera in your hands then set up your tripod to suit. 

I recently switched from a pan/ tilt tripod head to a ball head and love it. It's so much quicker and easier to use and is smaller and lighter to boot.

2. Check your camera

Check your ISO, white balance and quality settings regularly. You can correct the white balance at home if you are shooting raw but if your quality and ISO are off the mark you could well have wasted a day shooting. 

3. Decide what you are trying to do

The camera allows us to control what effect we get from our resulting photo. If we want to freeze or blur motion we can set the shutter speed to get the effect we want. If we are primarily concerned with depth of field we can control the aperture. This is a key decision.

Landscape photographers as a rule are primarily concerned with depth of field. Typically, we like a wide depth of field which renders the whole scene in focus. This often results in long shutter speeds being required to make a properly exposed photograph.

For the shot above all I was interested in was maximising the sharpness and optical quality of the shot. The sweet spot of any lens is when it is set to f8, so I set the aperture to f8 and adjusted the shutter speed to suit. 

I wasn't interested in what the shutter speed was as the camera was on a tripod and I wasn't trying to get any shutter speed effects like blur or whatever.

One other shot I should have tried is to get a bit more movement in the flag. To do this I would have set the shutter to say 1/30th, tweaked the aperture to give a correct exposure then took a shot to see if 1/30th gives enough movement.

It's all about deciding what you are trying to do and then experimenting until you nail it, pixels are free so play around with different effects. The best way to learn is to stick the camera in manual mode and go from there to make sure that you are making all of the decisions and you can see the results of the decisions that you are making.

4. Review the scene

Rest assured that however you have composed your shot you can always improve it. Check the entire scene for distracting elements such as litter or stray vegetation. Make sure your camera is level by investing in a hot shoe bubble level...only about a tenner but will last forever and you'll use it every time.

5. Try a variation of what you are doing

There is nothing more annoying that after bothering going to a location and doing everything right to get home and when reviewing your photos to think if only I had tried something else with that scene.

When you are in the field just try something else. If just one of these variations works out it will have been worth it. If it doesn't work just delete it, it's that simple.

------------------------------

Kit shopping list:

Hot shoe bubble level

Manfrotto Ball Head


Tuesday, May 05, 2009

Flower macro lit by flash...


Flower macro
Originally uploaded by Nevoir.

Well after a lengthy unintentional sabbatical from this photo blog its time to resurrect things.

This shot follows a couple of weeks of study around off camera flash. The source of knowledge was inevitably Strobist and the catalyst was buying a set of Elinchrom Skyport radio triggers from the guys at London Flash Centre.

I've been following the Strobist blog for years and always meant to get my head down and follow the lighting 101/ 102 tutorials. It turned out that the best route in for me was to get the strobist dvd and go from there. It is a fantastic learning resource and I found it the best way to join the dots of my patchy knowledge.

This shot was really quick to set up and can be done and dusted in 20 mins.

Anyway, the recipe for this shot is as follows.

You will need:

- Subject
- Something to trigger the flash
- Flash with something to diffuse the light
- Camera + tripod etc...
- Macro lens

1) Set up camera and tripod and choose your first composition with your subject.

2) Choose what you want to focus on while the main light is on as once the lights are out autofocussing becomes almost impossible.

Once you've selected your focus knock the auto focus to manual so that it wont shift. For this shot I chose to focus on the yellow "eyes" as they were an interesting feature.

3) Set up your flash and diffuser (I used a shoot through brolly) and position it as close as you can to the subject (from camera left).

4) Check your flash is triggering and that your subject is getting the light coverage you want.

5) Set your camera to manual mode and set the shutter to its synch speed. My D70 will synch up to 1000th sec but I went for 500th sec for this shot. A super fast shutter will leave you with a really, really under-exposed exposure which gets you that black background (without needing to bother using a piece of black card or whatever).

If you cant synch that fast don't stress, your cameras synch speed should be fast enough to knock the background out as long as your environment isn't too bright.

So your shutter speed gives you your black background and to get the narrow depth of field I chose an aperture of f4. The job of the flash is to illuminate the subject. This point of the shutter controlling the natural or ambient light and the flash controlling the light on the subject is absolutely fundamental to understanding how this stuff works.

6) Set the flash to manual and choose a setting to start with. The final setting on the flash was 1/8th power.

7) Turn the main lights out and set the white balance on the camera to Flash. I shot this at ISO 200 and shot raw files as ever.

8) Take a test shot using a cable release or use the self timer. It's probably not strictly necessary for this sort of shot with flash but its a force of habit and good practice I guess.

9) Check your histogram to see how close you are. If you are too dark either boost the flash power or move it closer if you can. You can also open up the aperture if you want but if you want f4 then change the flash to suit.

Whatever you do don't try and learn about the law of reciprocity which explains how this flash/ subject ratio all works because your eyes will bleed.

10) If you don't like the strong shadow on the right hand of the subject just hold some white card on that side to bounce some light back into the shadows.

This kind of shot is perfect for when the weather is too bad for a landscape session or its dark because you're back from work late and you've just got to create something.