flower
Originally uploaded by Nevoir.
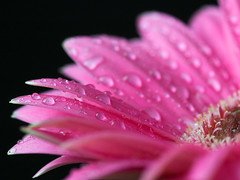
After reading Scott Kelbys excellent "Digital Photography" book I felt inspired to apply some of the stuff that I had picked up and spent a great few hours last weekend getting some new macro shots.
The approach of the book is to offer advice as if the author was there to ask directly how to get the shot. What this turns into is the equivalent of recipes for photos, which if you follow you cant help but get something like the picture that they show in the book.
This isn't to say that this photo lark is formulaic but you can't get away from the fact that there's a fair bit of technique going on here that anyone can follow to get some great results.
So following suit I thought i'd pass on the love and follow a similar format here. So in a true recipe format here goes, this is the recipe I followed to get this shot.
What I used:
- window with some diffused light coming through it
- tripod
- flower (go and get some cheap blooms from the supermarket)
- camera and a remote release
- macro lens
- water sprayer (the shower works well if you haven't got one of these)
- black background (I used a suitcase!)
How I got the shot:
- sit next to a window and position the flower so that its getting a good amount of light
- if it's a bright sunny day diffuse the light that hits the flower by putting some tissue paper or a shower curtain between the window and the flower. If your neighbours asks you why you are putting a shower curtain up in your bedroom lie to them!
- set your background a few feet behind the flower so it goes nice and black when you take your shots
- set your white balance on the camera, check you are using the lowest ISO and set the shot up so its all level
- use raw if you can as it gives you much more flexibility later on
- get your camera at the same height as the flower, this nails the depth of field effect if you are shooting at f5.6 or a similar wide aperture
- spray the flower to get some good beads of water
- set the camera to aperture priority and choose what aperture you want (this shot was at f 5.6)
- take a shot (using a remote release or your self timer) and see what you get
- check your histogram and re-shoot until you get some info in the graph up to just off the end of the far right hand side
- take loads of shots at different apertures, you are bound to prefer some more than others once you check them over on the computer
Tips
- keep everything as still as possible, if you can lock your mirror up then do it. If you get comfortable you wont shift about and ruin the shot
- try and get the white balance and exposure as good as you can in the camera, it minimises the time you'll spend behind the computer
No comments:
Post a Comment